Boring Nails Ruining Your Halloween Look? 16 Black Halloween Nail Ideas
Black Halloween Nails Ideas are the perfect way to get into the spooky spirit, and after hours of browsing forums and nail art sites, I’m thrilled to share the best designs with you.
From elegant black sparkles to dripping blood talons and intricate horror movie characters, these black nail art ideas will transform your fingertips into tiny canvases of Halloween magic.
Emerging Trends in Black Halloween Nails

I can’t wait to share some of the latest trends in black Halloween nail art with you!
Cute Black Halloween Nails
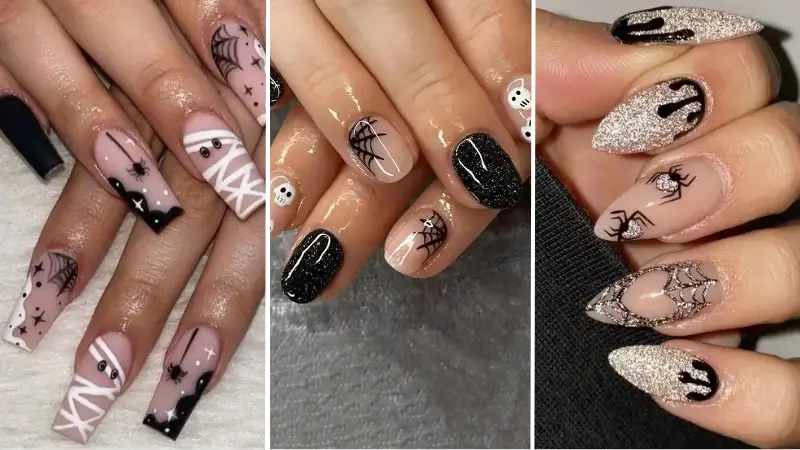
These Black Halloween Nails use a matte finish to create a tidy look for the season. The spider web patterns provide a clear theme without requiring a full costume. Choosing a neutral base ensures the design does not clash with your professional clothes.
Black Ghost Halloween Nails
A pointed shape is a bold choice for Black Halloween Nails but it fits the October theme well. The nude base prevents the dark patterns from looking too heavy on the hand. Small ghost details are a logical way to signal the occasion without being distracting.
Short Black Halloween Nails
Short Black Halloween Nails are the most practical option for a busy professional environment. The black glitter provides a durable surface that hides small scratches. Simple skull and web patterns are easier to maintain on this specific length.
Horror Black Halloween Nails
The realistic portrait makes these Black Halloween Nails stand out during the season. Long, pointed shapes are less practical for office work. Typing becomes difficult. A dark colour palette is a sensible choice because it hides small marks from daily use.
Black Spooky Ghost Halloween Nails
Black Halloween Nails with white patterns provide a clear visual theme. The pointed shape is a deliberate choice for the holiday. It can be fragile during manual tasks. Using a black base is logical for longevity as it does not stain easily.
Black Cat Halloween Nails
A square shape is often more stable than a pointed one for professional activities. These Black Halloween Nails include a cat pattern that is appropriate for a conservative office. The nude base ensures regrowth is less visible over several weeks. It is an efficient way to participate in the holiday.
Black Glitter Halloween Nails
Using silver glitter as a base for Black Halloween Nails provides a festive contrast. The almond shape is generally more durable than a sharp point. However, this length might interfere with daily tasks like typing or handling paperwork. Glitter polish is a logical choice because it stays on the nail for a long time.
Easy Black Halloween Nails
A nude base is a sensible decision because it makes nail growth less obvious over time. These Black Halloween Nails feature matte tips which look professional and tidy. The square shape is a classic choice. You should be careful with the corners as they can catch on knitwear or delicate fabrics.
Black Details Halloween Nails
These Black Halloween Nails use a pale base to highlight the intricate web designs. The extreme length is not very functional for a bank employee or anyone who uses a keyboard frequently. It requires a high level of care to prevent breakage. The designs are consistent and follow a logical theme for the month of October.
Black French Halloween Nails
An almond shape is often a durable choice for Black Halloween Nails. The nude base is logical because it makes the regrowth of the natural nail less obvious over several weeks. These dark, dripping tips provide a seasonal theme that is not too distracting for a professional environment.
Black Diamond Stone Halloween Nails
Using 3D stones and crystals for Black Halloween Nails creates a significant visual effect. However, the extreme length and heavy decorations are not functional for anyone who must use a keyboard daily. These gems could easily catch on clothing or fall off during routine tasks. It is a design better suited for a short event rather than a permanent seasonal choice.
Pure Black Halloween Nails
These Black Halloween Nails use a solid dark base to create a clean look. The almond shape is a logical choice because it is more durable than a sharp point. Adding small white patterns like a ghost or a web provides a seasonal detail that is not too distracting. This length is manageable for typing.
Black Spider Halloween Nails
These Black Halloween Nails feature a matte finish which hides surface scratches well. The inclusion of a glitter accent nail is a practical way to add variety without a complicated pattern. A coffin shape provides a large surface for the spider web art but might be prone to chipping at the corners. A dark grey web design is subtle.
Black Halloween Nails with Purple Details
These Black Halloween Nails use a purple accent colour to provide contrast against the dark base. The coffin shape is popular for seasonal designs because it offers a wide surface area for patterns like these webs and tombstones. Wearing such long nails is less practical for office work as they can make it difficult to operate a computer keyboard. Using a matte finish is a logical choice because it looks tidy and does not show fingerprints easily.
Long Black Halloween Nails
These Black Halloween Nails feature white spider web patterns on a dark matte background. Adding small 3D jewels creates a focal point, but you must be careful not to catch them on your clothing. The extreme length of these nails is not functional for daily chores or typing at a desk. It is a bold look that works best for a holiday event where you do not need to use your hands for manual tasks.
Scary Black Halloween Nails
These Black Halloween Nails feature detailed hand-painted characters and text on a monochrome base. The extreme length is not functional for office work. Using a black and white palette is a logical choice for high visibility. A glossy top coat protects the intricate artwork from wearing off quickly.
Detailed horror clown nails
These Black Halloween Nails include realistic illustrations of a horror character across several fingers. The oval shape is more sensible than sharp points. Adding red accents to a black base provides a clear visual theme for October. This artwork requires a professional application to look tidy.
Glossy black nails with white symbols
Choosing a glossy finish for Black Halloween Nails ensures they remain looking clean throughout the week. White symbols provide a clear contrast against the dark background. These pointed tips are difficult for typing because the sharp ends catch on the keys. A dark base is sensible because it hides scuffs.
How to Achieve the Perfect Black Halloween Manicure

Transforming your nails into the perfect black Halloween manicure involves selecting the right nail shape, using high-quality products, and following a detailed application guide.
Choosing the Right Nail Shape
When it comes to Halloween nails, choosing the right shape is key. I love going for dramatic shapes like coffin or stiletto to add a gothic flair.
Coffin nails are long and tapered, providing a larger canvas for elaborate designs. Stiletto nails, on the other hand, end in sharp points, giving an edgy, witchy vibe.
Almond and oval shapes are more subtle but still offer elegance, perfect for a more understated look. While square nails are classic, they can also be modernized with a sleek, black polish.
The nail shape you select sets the tone for the entire manicure, so choose one that complements your Halloween costume or overall theme.
Selecting High-Quality Products
Quality products make all the difference in a flawless manicure. I always start with a good base coat to protect my natural nails and ensure smooth polish application.
High-pigment black nail polish is essential for that deep, rich color. Brands like OPI, Essie, and Sally Hansen offer reliable, long-lasting formulas that resist chipping.
For added flair, I sometimes use black gel polish with UV light curing for extra durability. Glitter, rhinestones, or stickers can provide stunning accents.
Finally, a top coat is non-negotiable; it seals in the color and adds a glossy shine while extending the life of the manicure. Fast-drying top coats are particularly handy when you’re in a rush.
Step-by-Step Application Guide
- Preparation: Start by cleaning and shaping your nails. Push back cuticles and lightly buff the surface.
- Base Coat: Apply a thin layer of base coat to protect your nails.
- Polish Application: Paint your nails with a high-pigment black polish, allowing each layer to dry before adding the next. Two coats usually suffice.
- Design: For intricate black Halloween nail designs, use nail art brushes, stamps, or stickers.
- Top Coat: Finish with a durable top coat to seal your design.
- Cleanup: Remove any excess polish around the edges with a nail brush dipped in polish remover.
Incorporating Halloween Themes into Your Nail Art

When it comes to Halloween nail art, incorporating iconic spooky elements can enhance the festive vibe of your manicure. From pumpkins and ghosts to skeletons and spiders, I’ll share how to make your nails the highlight of any Halloween celebration.
Classic Spooky Symbols
I love using pumpkins as a feature on my Halloween nails. It’s easy to create with a bold orange shade and some green accents for the stem. This design instantly adds a festive touch.
Ghost nails are another favorite. Using a white base and drawing simple ghostly figures with black polish gives a playful yet eerie look. Adding tiny black dots for eyes completes the ghoulish effect.
Adding skeletons to my nail art requires a bit more detail but is so worth it. A black base works great, and using white polish to paint the skeleton bones or skulls can be quite striking. This look definitely stands out.
Spider nails are perfect for those who want a creepier vibe.
I often start with a dark or black base and use silver or white to create the spider’s body and legs. The contrast really makes the design pop.
Of course, I can’t forget about the black cat. Simply painting the silhouette of a cat on a dark background with glowing eyes can look both eerie and elegant. This design adds a mysterious element to the overall look.